Home Archives About
moefh.github.io
The Magic Smoke Has Left the Building
Pico Homemade MIDI USB Keyboard

I made a very simple homemade MIDI keyboard USB device using the Raspberry Pi Pico:

MIDI keyboard device built using a Pico attached to another Pico  acting as a hardware  debugger
MIDI keyboard device built using a Pico attached to another Pico acting as a hardware debugger

The keyboard is just 12 buttons arranged as a vague semblance of a piano keyboard (just one octave). Each button closes the connection to ground when pressed, and is connected to an input pin of the Pico which is pulled up, so when the button is pressed the input goes low.

I used TinyUSB to make the Pico act as a MIDI USB device when connected to a PC. The program is really simple: I just changed a MIDI example included in the TinyUSB project, adapting it to send MIDI notes when the buttons are pressed, with some very rudimentary debouncing for the buttons.

This project gave me an excuse to learn how to program and debug a Pico using another Pico as the hardware debugger, using picoprobe (I had to do it because I usually printf debug using the USB serial, but that obviously wouldn't work in this project). To use picoprobe you just have to flash the Pico that will be used as the debugger with the picoprobe firmware (picoprobe.uf2) and make some connections from its GPIO pins to the Pico being debugged (SWD pins and the UART RX/TX).

Everything went really smoothly, so there's nothing much to say, other than Picoprobe is a great way to upload programs to the Pico: there's no need to reset with the Bootsel button pressed. I might start using it even when I'm not using the USB for anything else. You can also actually run GDB to debug the program live on the Pico, but I rarely use GDB like that.

On the MIDI device side of things, it works really great on Windows. I was even able to record a crappy song I played on the crappy keyboard using MidiEditor, even though there's some noticeable input lag.

On Linux, I see no input lag when dumping the MIDI events with aseqdump (an Alsa command line program), but I had no luck recording input from the MIDI device using MIDI editors or other GUI programs. Every GUI program I tried wasn't able to receive MIDI input -- most of them just crash when trying to connect to Jack (which is installed and running, but for some reason doesn't work), and the ones that can be configured to use Alsa simply don't work when told to do so. I have no energy to try to make this work, so I'll have to use Windows if I want to do more with this project.

In any case, this was a fun little project to learn how to make the Pico into a USB device and use Picoprobe.
Porting Loser Corps to the Raspberry Pi Pico - Part 2

I finished bringing the Loser Corps port on the Pico on par with the ESP32, and then added sound output supporting 4 sounds plus music at the same time, with music coming from a MOD player I wrote from scratch for the Pico.

Sound Hardware

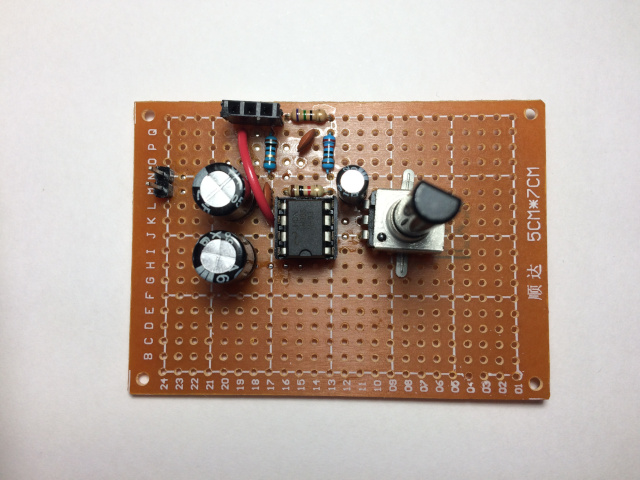
First, let's look at the hardware side. This is my homemade sound amplifier board:

Homemade amplifier using an  LM386
Homemade amplifier using an LM386

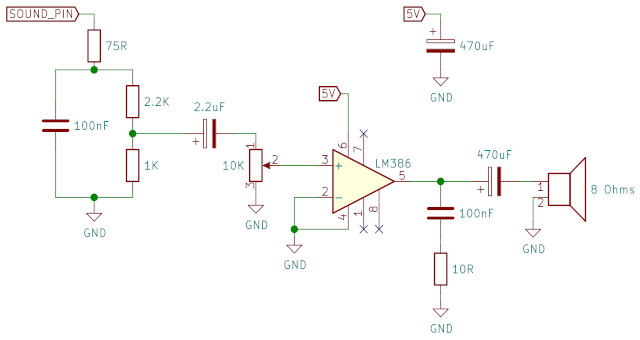
The input is at the 3-pin female header at the top (VCC, GND and input) and the output is at the 2-pin male header on the left (GND and output). This board is very similar to what I had in the last post in the breadboard, I just changed some capacitor values and moved the potentiometer for the volume control to go between the input coupling capacitor (now 2.2 μF) and the LM386. Here is the updated schematic:

Homemade amplifier using an `LM386`

One thing I didn't mention in the last post is that I tried using generic potentiometers for the volume control, but the metal casing added a lot of noise (this may be be a common thing, or it might be just because I live pretty close to some big radio towers, I have no idea). I ended up buying the sound table potentiometers you see in the photos, they're more expensive but work pretty well.

Sound Code

Now, the software side. The sound code is based on the setup I had on the last post, with the addition of MOD music playing. It can play music plus up to 4 other sounds at the same time.

The music is played with a simple MOD player I wrote from scratch for the Pico. The player supports only 4 channels (easily changed in a #define) and is currently missing a lot of MOD effects like tremolo and vibrato, but it's good enough to play a really good Axel F MOD pretty close to what VLC does, so I'm happy with it. I also tested it with the MOD files from Flashback (the game from 1992) and a few other MODs from modarchive.org.

The player modulates notes by streching or compressing the input samples to the required sample rate, always choosing the nearest input sample (think scaling an image using the "nearest" algorithm). It causes aliasing but it's very fast -- I use a fixed point number (20.12) to store the index of the current sample, and add fi/fo to it after playing each sample, where fi is the sample rate of the note and fo is the sample rate of the output sound (22050Hz). So if the MOD requests a sample to be played at 22050Hz, fi/fo would be 1 and the sample would be played without any modulation (i.e., each input sample would be sent exactly once to the output); if the frequency requested is 11025Hz (half), then fi/fo would be 0.5 and each input sample would be sent twice since it would take two additions to the sample index to advance to the next sample.

Of course things are a little more complicated than that, because MOD files store the sample frequency as periods of the original Amiga clock (7.09379 MHz), so there's some annoying math involved (the annoying part is in making sure we get a reasonable precision while avoiding overflow). To get the gory details, see the file game/lib/mod_player.c on Github.

I might improve the MOD player in the future, but I'm pretty happy with it for now.

Other than the MOD player, I added some sound effects. There's a small "bump" sound then the player character hits the ground (I recorded it by gently tapping a microphone some 20 years ago when making the game on PC) and a generic explosion sound when a shot hits something (taken from a free sound library from 20 years ago).

Other Code Improvements

And finally, not related to sound at all, a small improvement: I added some tile caching when drawing the screen to improve the speed, making sure the game never drops under 60 frames per second. Some parts of the map use too many different tiles, which used to cause problems because the CPU couldn't stream data from the flash fast enough to draw the entire screen in 16 miliseconds. So I copy some of the most-used tiles to RAM at the start, and that fixes the problem.

As usual, the code is on Github.

Sound Output with the Raspberry Pi Pico

I started playing with sound with the Raspberry Pi Pico. I'm using using an LM386 amplifier and an old 8Ω speaker:

Photo of the Pico, the LM386 amplifier and the speaker

For the sound generation code, I'm using the PWM/DMA method described in this blog post. It uses PWM sounds with 8-bit samples at 22050 Hz. I wrote a simple mixer on top of that to play multiple sounds at the same time, and an easy-to-use API for starting sounds with the option to loop, since I'll add this to the Pico Loser Corps port.

This is the schematic for the sound output:

Sound output schematic

I'm using a voltage divider with 2.2K/1K to bring the sound signal in the range 0-1V in with a 100nF capacitor in parallel to filter the unwanted high frequencies, connecting the result to the input of the LM386 using a potentiometer for volume control. The rest of the schematic was taken from the "typical application" section of the LM386 datasheet. Leaving its pins 1, 7 and 8 not connected results in a gain of 20, which is enough for my tests.

I had to change some resistors and capacitors because I didn't have the recommended values available. The 75Ω connected to the SOUND_PIN was meant to be a 68Ω, and the 100nF capacitor on the LM386 output was meant to be 50nF.

I also decided to use a 1000μF capacitor on the LM386 output instead of the 250μF recommended by the datasheet to try to improve the bass. I don't think it matters too much with that crappy speaker, but it doesn't hurt.

The overall sound quality is not that great: the sample size is 8 bits, and the whole thing is mounted on a breadbord. But it's usable for now, and probably good enough for the game sound effects.

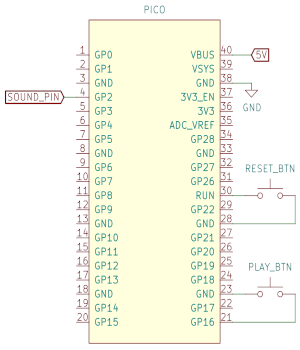
The code keeps playing a synth sound on loop, and queues a small drum sound when you press the button. For completeness, here's the schematic showing the Pico connections, including the button that triggers the drum sound:

Pico connections schematic

The code is set up to mix up to 4 sounds, so if you press the button too quickly it will start ignoring presses until there are less than 4 sound playing at the same time.

The sound generation code is in audio.c and audio.h, this is the API:

  // init
  audio_init(SOUND_PIN);
  
  // play once (use the returned sound_id to control volume or stop)
  int sound_id = audio_play_once(samples, num_samples);

  // set audio volume (8.8 fixed point)
  audio_source_set_volume(sound_id, 3<<8);

  // play in loop (3rd argument says where to start the loop)
  sound_id = audio_play_loop(samples, num_samples, 0);

  // stop playing
  audio_source_stop(sound_id);

The mixer must be manually called at least once every 45 milliseconds or so (this interval depends on the sound buffer size configured in audio.h; a larger buffer allows for more time between calls at the expense of more latency for starting sounds):

  while (1) {
    audio_mixer_step();

    // ... other code ...

    sleep_ms(30);
  }
  

As usual, the code is on Github.